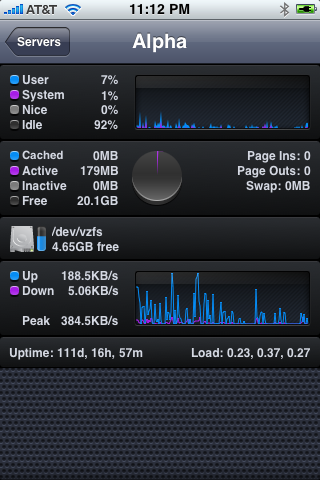
For those of you with a Mac or an iPhone, you may be familiar with a program called “iStat”. iStat is a program that lets you monitor system resources either locally or remotely with the iPhone app. For some time, the Mac has been the only release platform, but thanks to the work of William Tisater, an open source version has been released for Linux.
It’s fairly simple to install once you have the necessary requirements:
- iPhone App: http://bjango.com/apps/istat/
- Linux Server: http://github.com/tiwilliam/istatd/downloads
- Root access to a linux server.
- At least some idea of what you’re doing.
1. Make sure you buy the iphone app.
2. SSH into your linux server and “cd” into the directory of your choice, /home/yourusername
3. Do a wget for the tar.gz linux server app.
4. Unzip it, tar -zxvf filename
5. cd into the new directory, and run the configure script. ./configure
This is probably where you will run into some errors. You will probably get a C++ compiler error, if that’s the case, do yum install gcc-c++. Once it installs, run ./configure again, if you get a xml2 error, you will need to do yum install libxml2-devel. That should take care of the requirements on most servers, if you’re still having dependency errors, just look them up and install the appropriate package with yum.
6. Assuming it configured without error, run make, followed by make install.
7. Once it’s installed, you will want to edit the config file, it’s located in /usr/local/etc/istat.conf
In this file are some important lines, such as:
- server_code: this is your “password” to log in
- monitor_net: this is your network interface you want it to monitor
- monitor_disk: this is your hdd(s) you want it to monitor
8. Once you have made the changes to the conf file, you can launch the server by running /usr/bin/istatd -d
9. That’s it! Most likely you will want the istat server to auto load if the server is restarted, if that’s the case, then just add /usr/bin/istatd -d, or more simply istatd -d to your /etc/rc.local file.
Here’s what it looks like when it’s all said and done. The RAM usage is not correct in this screen shot since it’s on a virtual dedicated server.


Jason, I have iStat running on my Linux Red Hat server, however, using monitor_disk I can only get 1 disk to work, I currently have 5 that I would like to monitor, but only /home shows up.
I have added:
mount_disk ( /home )
mount_disk ( /home2 )
mount_disk ( /boot)
mount_disk ( /var )
Any ideas why only one is appearing?
@Chris
You want it all on one line, like:
monitor_disk ( /home /home2 /boot /var )
However, if these are on the same physical drive, it’s not going to work.